Crochet Project: teeny tiny crochet (part1)
- Cienna Knights

- Feb 10
- 10 min read
Am I the only one who saves crochet patterns and buys crochet books with every intention of making said patterns, and then ends up with tons of purchased patterns I've never made? Hopefully not, but here we are!
For a few different reasons I've decided to begin a rather ambitious task of crocheting everything in a crochet book that I currently own. I say "ambitious" because I am going to include the items I would normally skip over either because I'm not sure if I like the item produced, or because the pattern looks like it would take ages.
My reasons for taking on this task
Reason number one is I want to actually make the items in the books
True, I have been gifted a few of the crochet books that I have. But even the pattern books that I don't pick out always have a few patterns that just look really lovely or I could see someone I know really liking that item as a gift. I think the problem is that when I want to crochet something specific in some way, I look for a pattern on Pinterest instead of in my personal pattern library. Creating each of the patterns in a book will give me a physical library of the patterns I have on hand.
Reason two is I want to gain more crochet knowledge
The more you work at something , the better you get. I have a tendency to focus on the same kinds of patterns and designs (primarily the ever faithful traditional granny square). However, I want to be more comfortable with all sorts of patterns and methods, especially if I want to design more crochet patterns of my own.
You can get the first pattern I ever designed on my website, or here on my Etsy shop page, or just one size for free here.
Reason three is this will be a great yarn buster!
Like any crocheter, knitter or yarn crafter, collecting yarn and wool becomes second nature. Sometimes I don't even realize I've come home with more yarn until I don't have anywhere to put it! All of that to say, I have tons and tons of yarn that I would love to use.

Teeny Tiny Crochet: 35 adorably small projects
The book I am starting with is Teeny Tiny Crochet: 35 Adorably Small Projects by Catherine Hirst. My copy of this book was gifted to me back when I was working at a haberdashery in Chester, England called Abakhan Fabrics, Hobby and Home. Since receiving the pattern I have made: Gus the Sausage Dog, Mama and Baby Bunny, just the snowflakes from Itty Bitty Snowflake Garland and Stanley the Snail which was the first ever pattern I made from this book. I think I have also made one of the cakes in the book, but I don't for certain remember.
I chose to start with this book because it has quick projects that won't be discouragingly complex, or take too long to complete. It is also one of, if not the first crochet book I have ever owned, so this book is fitting.
Without further ado, lets move on to the projects!
Materials I used regularly throughout:
Aleene's Fabric Fusion: Permanent Fabric Adhesive: I bought this glue for medieval bunting I have been making for my wedding, and it has come in so handy since then!
Doll Eyes: These eyes are great for small, personal, or quick projects. However, these are not safety eyes so do not use these eyes on a project you intend to give to an infant, toddler or child. Even using fabric glue, there is always the chance they will fall off. The patterns do primarily call for safety eyes.
Felt: This felt is nice because it comes with a lot of colors, but each sheet is 35 inches long. I purchased these for my wedding bunting and used the leftover colors in the below projects. Because these projects use such small amounts of felt, I would either recommend getting individual squares of felt from a craft shop or buying a bundle of 12x12, or even 6x6 inches felt squares. If you don't already have a pile of felt at home!
Embroidery needle
Tapestry needle
Scissors
Embroidery, or sewing thread in multiple colors (or at least in the colors that match your felt) and black.
The Teeny Tiny Crochet: 35 adorably small projects by Catherine Hirst book
And of course yarn - these projects are perfect for scrap yarn bits!
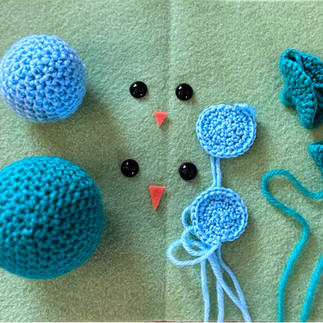
Mama and Baby Bird

This is the very first pattern in the book, and it's really one I wasn't super interested in making, however it is cute.
What I did differently
The pattern called for 2 strands of lace weight yarn crocheted together. Instead I used, 1 strand of DK or Light Weigth (3) yarn.
The yarn I used was CRAFTISS set of 30 20g/0.70ox Acrylic Yarn Mini Skeins that I purchased from Amazon years ago. The mama bird used exactly 1 skein of this yarn using a 2.75mm (C) crochet hook.
A quick review of the CRAFTISS Acrylic Mini Yarn: this yarn is okay, but I would not buy it again. It's a little too stretchy to me and can be quite painful on my hands if used for certain projects or for long periods of time. I used this yarn to make tiny doll-sized granny square bags, and would not do it again! All that to aside, this yarn is ideal for beginners and/or if you make a lot of tiny projects and like lots of color options.
I decided not to use safety eyes, and instead use glue-on eyes, and I used some pink yarn to make a slight blush.
To finish off the nest, I worked 1sc, 1 slip stich in the last two stiches on the last round so that the end wasn't so abrupt looking.


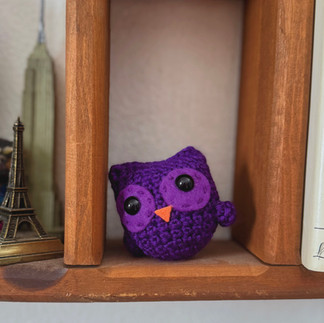
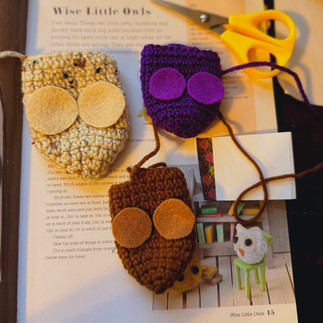
Wise Little Owls

This was the second pattern in the book, and I loved how quick it was. Generally for a pattern that is supposed to be under an hour, I still takes me at least an hour to make all of the parts before I sew anything together or weave in the ends. However, for this little owl pattern I was able to make all of the parts: body and wings, for 3 separate owls in an hour!
What I did differently
For the owls, like with the birds above, I used glue on eyes instead of safety eyes. Because I used glue on eyes, I sewed the felt on before gluing the yes.
To close the head of the owl, I completely omitted the pattern for that part and just did a simple slip stich to close. I only used the inside loops on each stich for the slip stiches when closing though.
I used the CRAFTISS yarn again for purple owl, and two separate no-longer-labeled balls of scrap yarn for the brown and the nep/cream owl.
Thoughts on the owl pattern
Initially, I was least excited about the owl, but now that I know it's such a quick pattern I would definitely make them again. Plus they are really cute!


Beautiful Butterflies & Flower

Butterfly
The butterfly and flower pattern share a single page in this book - like how the birds and the nest shared the same pattern pages. The butterfly pattern has been my least favorite so far. It's more of an applique and you've really got to know what you're going to do with it before you make the butterfly.
In general, the butterfly pattern isn't very difficult, and is actually faster to make than even the owl. Part of my dislike could be based on the yarn that I used, the CRAFTISS yarn again. It came out very wobbly and would probably be better off made with a cotton.
In fact I did make another butterfly with cotton and it turned out much better. The wings lay nearly flat, which is the biggest bonus.

What I did differently
The only thing on the butterfly that I did differently from the pattern, was that after following the directions for the body, I folded the body over on itself and sewed along the wing which I felt gave it even more of a butterfly look.
Flower
The flower was even quicker, and would make a really easy applique. The first two flowers I made turned out very wobbly, but after making the third flower in cotton, I realized that I had been doing the wrong stitch. This wrong stitch was what caused the wobbly look in the case of the flowers.
Like with the butterfly, the flower made with cotton yarn presented a much flatter flower.

What I did differently
The pattern only called for one color, but I changed the color for the petals. I probably could have even changed the color in the third round, but I've only just thought of that now.
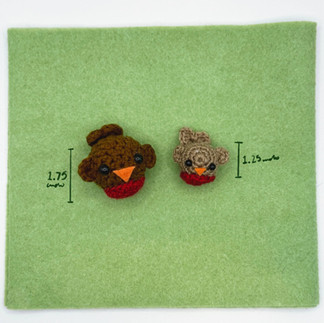
Robin Red Breast

The robin pattern is proper cute. I can't say that I was excited to work on it, but I was intrieged. Going off the pictures in the book, I did not like how the red belly part looked _ I could tell it was going to be crocheted separatly from the rest of the body. Even after I made the pattern, I wasn't a huge fan of the red belly, but it's cute either way which is what matters!
Like the owl, the pattern is pretty quick to make, and is actually even smaller than the owl.


What I did differently
For the red breast part, I finished the last round as written, and then added two stiches - ending with an additional 1 sc, 1 ss. I did this so that there wouldn't be a sharp end to the circle.
Note: The pattern actually does mention the final slip stitch (ss) after the round but I missed that step reading the pattern the first time around. Additionally, the single crochet (or American double crochet) that I added before the slip stitch was necessary at the time because my stitches were quite tall - of course now I know it was the wrong stitch.
What I've been doing wrong
What I noticed at this point, because of the robin pattern, was that I had been working each project with the wrong stich up until this point. This is where my learning both the English and American crochet terms has been a disadvantage. Every pattern so far has used double crochet (dc), and even though I checked the back the of the book for directions to make sure I was doing the correct stitch I have still been getting it wrong. This is completely my fault and not at all the fault of the book - my eyes read the image directions wrong. I have gotten so used to an American single crochet (sc) that I forgot the UK equivalent.
I noticed something was wrong during this robin pattern because you can see the poly-fil through the stiches far more than you can with every other pattern (excepting the flecked owl, but I had thought that was because I did not used the correct hook size and looked past it). After having finished all of the parts, and having sewn up the bodies of the robins, I did another check on the stitch directions for dc and realized it exactly resembles a single crochet (sc).
I think my mistake happened because I knew the book was an English pattern book, and I know that the terms are different. But because it has been so long since I worked off of an English pattern, when I checked the back of the book I expected to find the instructions different and saw in the directions what I expected.
All of that to say I should have been doing a sc this whole time, but can't change that now! I could go back and remake the birds, owls and butterfly, but I won't - the mistake is part of the process now.
Just so we are all clear:
English Crochet Term | American Crochet Term |
Double Crochet (dc) | Single Crochet (sc) |
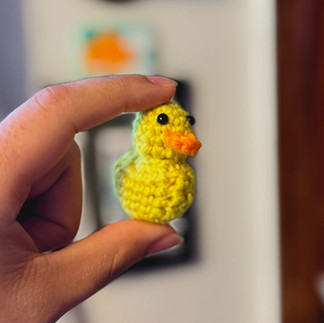
Teeny Ducks on a Pond

Using the correct stitch, the first thing I noticed with this pattern was how small the ducks are! I'm fairly certain I gave an audible gasp when I finished the body of the duck and it was about the width of a half dollar coin. Do half dollar coins still exist for people to get the measurement reference?
The body of the duck completed at about 1.5 inches. So small! Usually I don't go for really small and fiddly projects because it hurts my hands, but I was also really excited to see how the rest of the patterns were going to turn out. I decided at this time to think about remaking the first few patterns to see if they came out just as small.
What I did differently
The pattern called for embroidering the eyes, but I used my trusty glue - on eyes instead.


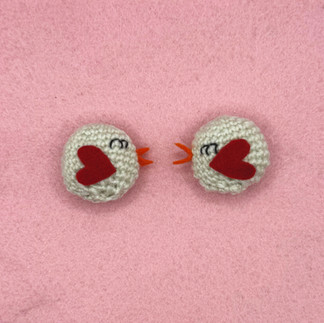
Loveable Lovebirds

This pattern was the most involved, and required the most supplies in that it had the least amount of crocheted parts. The wings and beak are felt and the eyes are embroidered. The beak was sewn on and the wings were glued - although I'm sure that sewing the wings might look nice as well.
I did not do anything to deviate from the written pattern on this one!


Remaking the First Four With the Correct Stitch
Despite earlier objections, I did finally decide to remake the first four patterns with the correct sc/dc stitch. Using the correct stitch, did make the little plushies come out much smaller (I can't imagine how small they would be using the thread size the patterns actually calls for - primarily lace weights!). Being so much smaller, does cause a bit more pain because of how much extra attention and grip I need in order to hold on to the project in one hand to stabilize it to crochet with the other hand. If anyone has any tricks to not making your hands hurt, I'm all ears!
The stitch I was doing that made the plushies larger:
insert hook into stitch, yarn over and pull through stitch (two loops on the hook)
yarn over, pull through one loop (two loops on hook)
yarn over, pull through two remaining loops


Review of Part One: Flying Friends
So far, I would definitely recommend this crochet book. Of the 6 patterns in this section, I would for sure make again the: owls, flowers, ducks and robins on a repeat basis. I might even be compelled to make more of the lovebirds or the mama and baby birds again - but more seasonally.
The robin I wasn't in love with at first with the incorrect stitch. Although fairly quick to make, something about the finished piece wasn't convincing. In some angles it looked more like a sock monkey. However, after making the robin a third time with the correct stitch it was an even quicker project and turned out so small and adorable! Would make again!
The butterfly is okay if I know what it's going to be and I have a plan for it. Maybe butterfly bunting, or sewn onto a bag, or made into a pin or hairclip? It just doesn't function as a toy or plushie the way the other patterns here do.
I do wish that the patterns in the book were more specific, or specific at all, on where to attach wings, eyes, beaks, etc. Each pattern usually just ends with "attach wings to body". Rather than the way that other patterns will say "attach eyes between rows x and x, x stitches apart."
I would really love to hear your thoughts on the crochet book if you have it, or the finished products. Do you have plans to buy the book after reading this very journal-entry-vibe of a review post? Did any of these flying friends seem like something you would want to make yourself?
See you in part two!
Comments